Websocket, Cloudflare tunnel, apache httpd and a bit of security
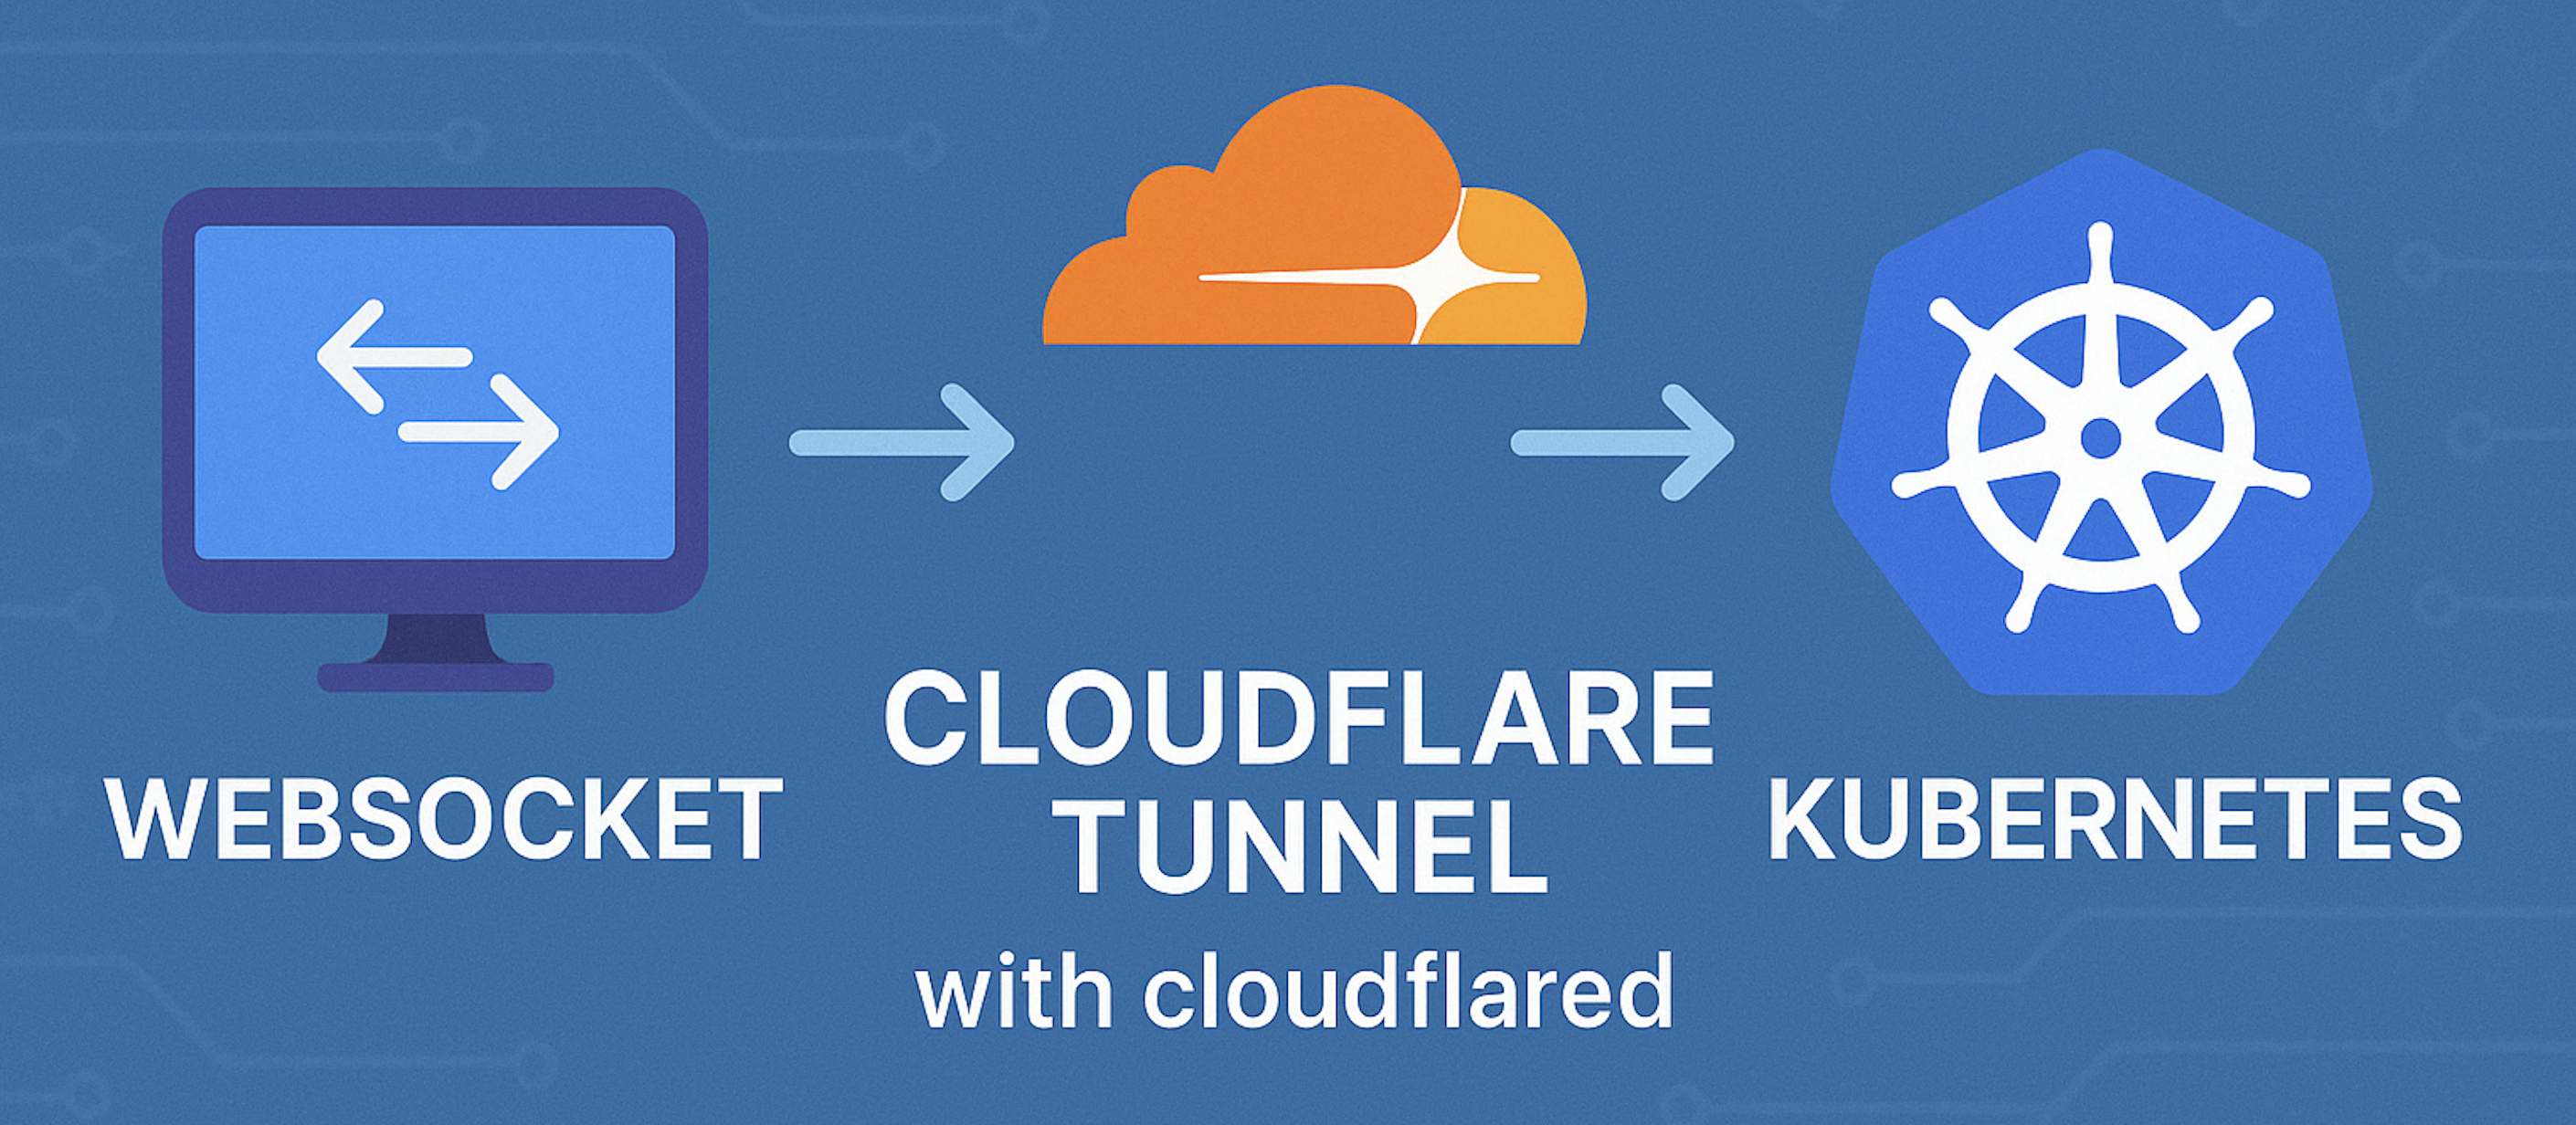
Table of Contents
Here we are
The Infrastructure Overview
In today's interconnected world, exposing your home lab or self-hosted services to the internet can be both necessary and risky. Traditional methods like port forwarding or VPNs come with their own set of challenges and security concerns. This is where Cloudflare Tunnel (formerly Argo Tunnel) comes in as an elegant solution.
In this article, I'll walk you through how I've implemented a secure infrastructure using Cloudflare Tunnel with WebSocket support, running on a Kubernetes cluster with Apache HTTPD as a reverse proxy. This setup allows me to securely expose internal services without opening ports on my residential firewall while gaining the benefits of Cloudflare's security features.
Starting point
This one of the scenarios (what made me crazy) where websocket are in use , grafana, since version 8.~ starts to use websocket to update dashboards
The original idea was to define a "role" for each aspect

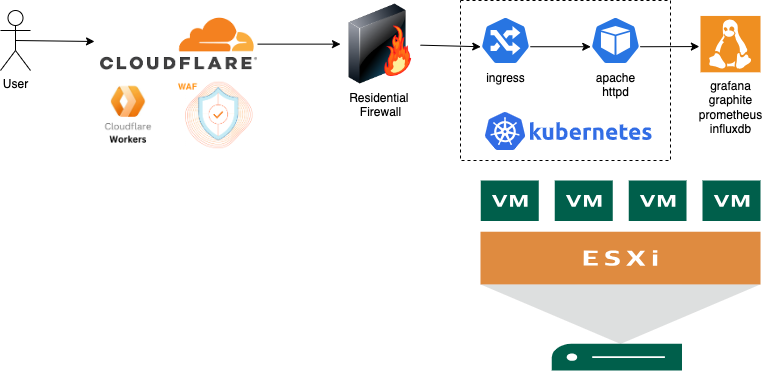
 Vmware esxi as a "flat" platform to abstract hardware brands, extend portability, backups, etc etc
 Kubernetes for all the workloads can be run as immutable images

The code used for workers was the following
const securityHeaders = {"Content-Security-Policy":"upgrade-insecure-requests","Strict-Transport-Security":"max-age=3600;includeSubdomains","X-Xss-Protection":"1; mode=block","X-Frame-Options":"DENY","X-Content-Type-Options":"nosniff","Permissions-Policy":"geolocation=()","Referrer-Policy":"strict-origin-when-cross-origin"};async function addHeaders(req) {constresponse=awaitfetch(req),newHeaders=newHeaders(response.headers),setHeaders=Object.assign({},securityHeaders);if (newHeaders.has("Content-Type") &&!newHeaders.get("Content-Type").includes("text/html")) {returnnewResponse(response.body,{status: response.status,statusText: response.statusText,headers: newHeaders});}Object.keys(setHeaders).forEach(name=>newHeaders.set(name,setHeaders[name]));returnnewResponse(response.body,{status: response.status,statusText: response.statusText,headers: newHeaders});}addEventListener("fetch", event => event.respondWith(addHeaders(event.request)));Why Cloudflare Tunnel?
Before diving into the technical details, let's understand why this approach is superior:
- No Open Inbound Ports: Cloudflare Tunnel establishes an outbound-only connection, eliminating the need to open ports on your firewall
- DDoS Protection: Cloudflare's network absorbs and mitigates attack traffic before it reaches your infrastructure
- Zero Trust Access: Integrate with Cloudflare Access for identity-based authentication
- TLS Encryption: All traffic is encrypted end-to-end
- WebSocket Support: Critical for real-time applications and API
Setting Up Cloudflared in Kubernetes
The core component of this setup is cloudflared, the daemon that creates and maintains the secure tunnel. Here's how I've deployed it in Kubernetes:
Configuration
Let's examine the key components of the ConfigMap that defines how cloudflared operates:
apiVersion: v1
kind: ConfigMap
metadata:
  name: cloudflared
  namespace: cloudflared
data:
  config.yaml: |
    # Name of the tunnel
    tunnel: home
    credentials-file: /etc/cloudflared/creds/credentials.json
    metrics: 0.0.0.0:2000
    no-autoupdate: true

    # Ingress rules define traffic routing
    ingress:
    # Special case for Let's Encrypt verification
    - hostname: services.k8s.it
      path: /.well-known/acme-challenge/
      service: $internal-ingress
      originRequest:
        httpHostHeader: "services.k8s.it"
        noTLSVerify: true
        http2Origin: true

    # Main service routing
    - hostname: services.k8s.it
      service: $internal-ingress
      originRequest:
        httpHostHeader: "services.k8s.it"
        noTLSVerify: true
        http2Origin: true

    # Default rule
    - service: http_status:404
This configuration maps different hostnames to internal services, with special handling for WebSockets and HTTP/2 connections.
Deployment
Here's the deployment configuration for cloudflared:
apiVersion: apps/v1
kind: Deployment
metadata:
  name: cloudflared
spec:
  selector:
    matchLabels:
      app: cloudflared
  replicas: 2  # For high availability
  template:
    metadata:
      annotations:
        prometheus.io/path: /metrics
        prometheus.io/port: "2000"
        prometheus.io/scrape: "true"
      labels:
        app: cloudflared
    spec:
      containers:
      - name: cloudflared
        image: cloudflare/cloudflared:2023.7.0
        args:
        - tunnel
        - --config
        - /etc/cloudflared/config/config.yaml
        - run
        livenessProbe:
          httpGet:
            path: /ready
            port: 2000
          failureThreshold: 1
          initialDelaySeconds: 10
          periodSeconds: 10
        volumeMounts:
        - name: config
          mountPath: /etc/cloudflared/config
          readOnly: true
        - name: creds
          mountPath: /etc/cloudflared/creds
          readOnly: true
      volumes:
      - name: creds
        secret:
          secretName: tunnel-credentials
      - name: config
        configMap:
          name: cloudflared
          items:
          - key: config.yaml
            path: config.yaml
Notice the use of multiple replicas for redundancy and the liveness probe that ensures connectivity to Cloudflare's edge network.
How the Traffic Flows: Sequence Diagram
Let's visualize how a request flows through this infrastructure:
User -> Cloudflare -> Cloudflared -> Kubernetes Ingress -> Apache HTTPD -> Application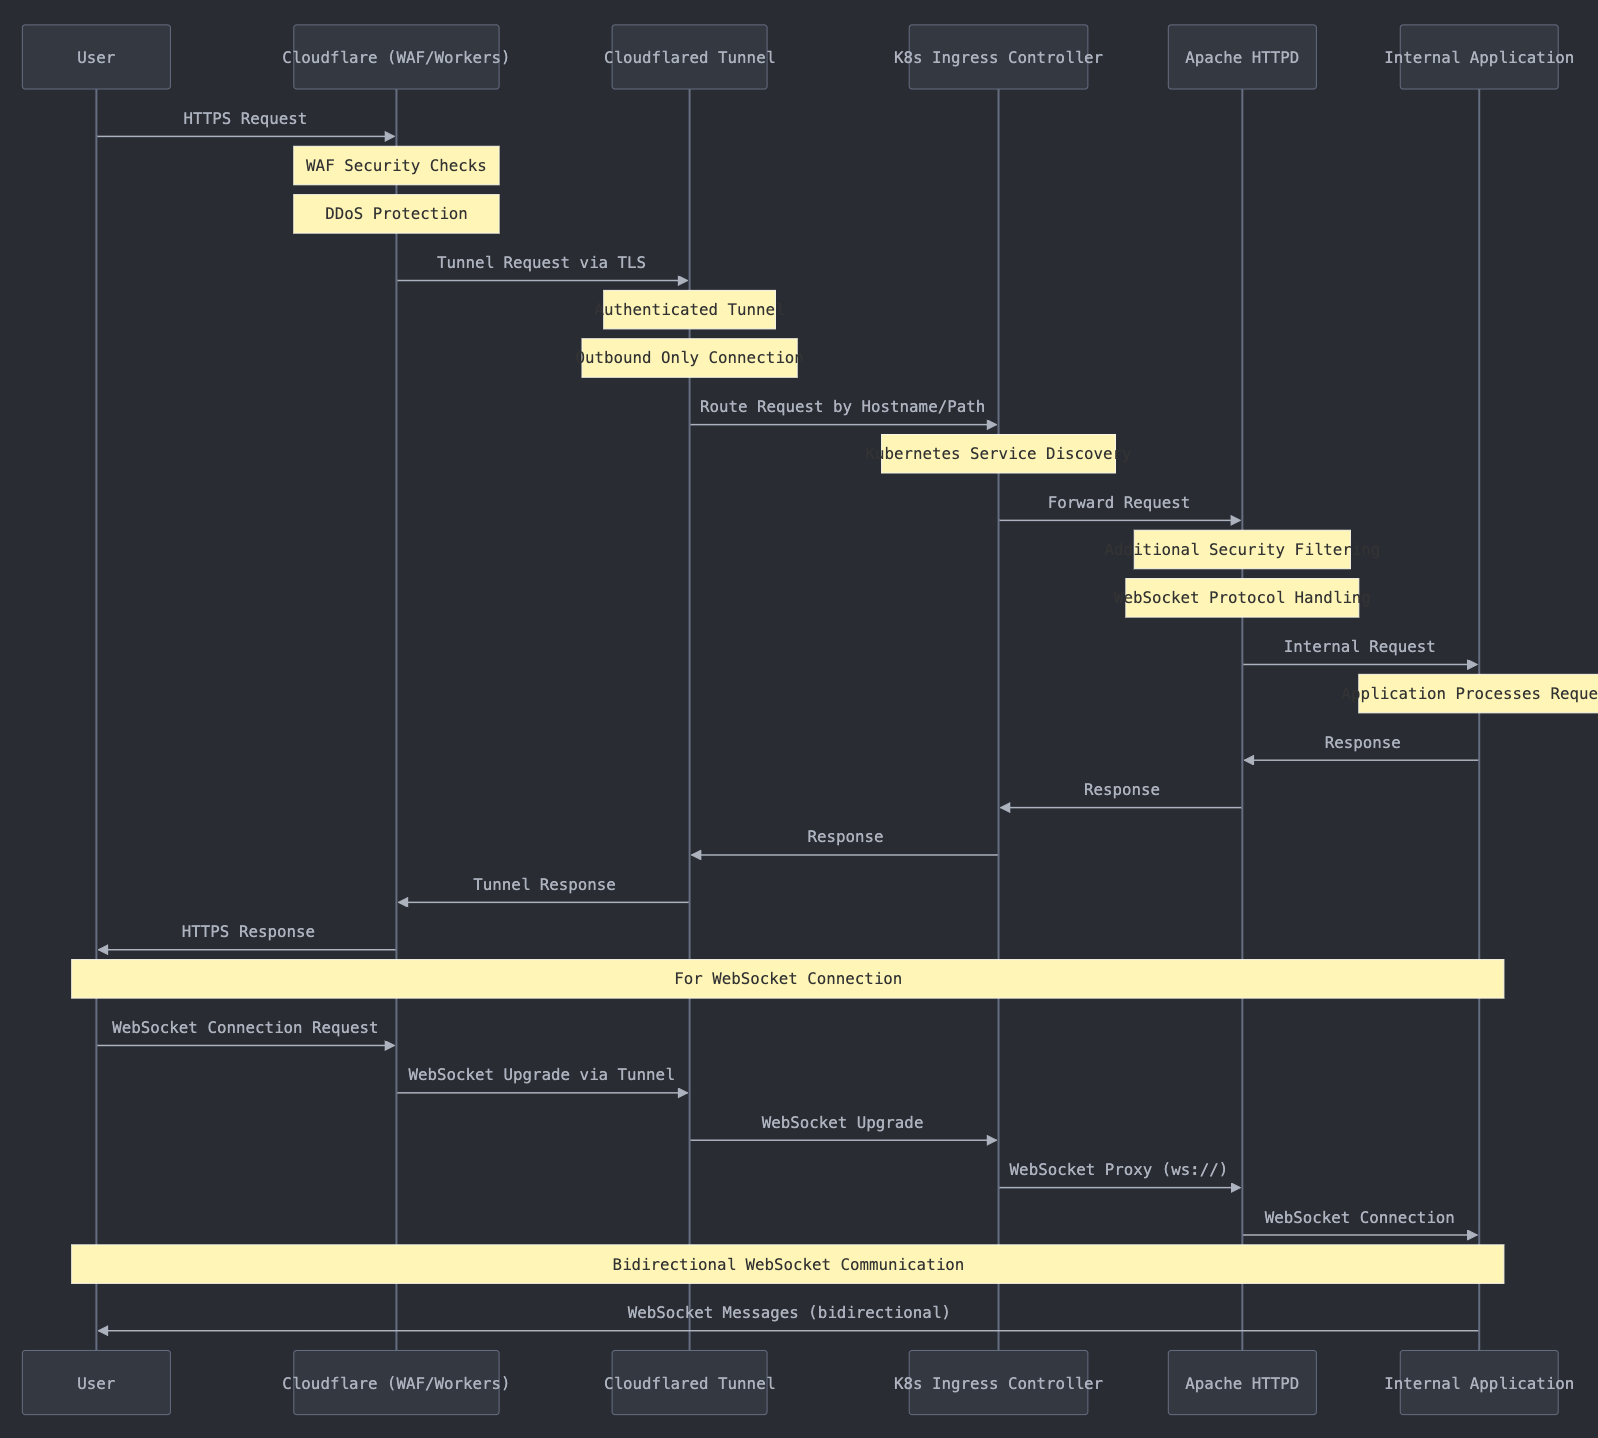
Security Considerations
1. Cloudflare WAF Protection
Cloudflare's Web Application Firewall provides protection against:
- SQL injection attacks
- Cross-site scripting (XSS)
- Cross-site request forgery (CSRF)
- DDoS attacks
- Common vulnerabilities
2. Zero Trust Network Architecture
The setup follows zero trust principles:
- No exposed ports on the residential firewall
- All connections initiated outbound from inside the network
- No direct path from internet to internal services
3. Defense in Depth
Multiple security layers provide redundant protection:
- Cloudflare WAF (first line of defense)
- Kubernetes network policies (segmentation)
- Apache as an additional security layer (request filtering)
- Application-level security
4. Credential Management
Cloudflared credentials require careful handling:
- Store tunnel credentials as Kubernetes secrets
- Regular credential rotation
- Limit access to credential management
5. HTTPS Everywhere
All traffic is encrypted:
- TLS between user and Cloudflare
- TLS in the tunnel between Cloudflare and cloudflared
- Optional TLS for internal communications
Monitoring and Observability
The infrastructure includes robust monitoring:
- Prometheus Integration: Cloudflared exposes metrics on port 2000
- Grafana Dashboards: Visualize performance and security metrics
- Logs Aggregation: Collect logs from all components for analysis
annotations:
  prometheus.io/path: /metrics
  prometheus.io/port: "2000"
  prometheus.io/scrape: "true"
Advanced Configurations
Load Balancing
For high availability, the setup uses multiple cloudflared replicas:
replicas: 2 # Multiple instances for reliabilityCloudflare's global network automatically balances connections across available tunnels.
Path-Based Routing
The ingress configuration supports path-based routing:
- hostname: services.k8s.it
  path: /.well-known/acme-challenge/
  service: http://$internal-ingress
This allows for complex routing scenarios based on domain and path.
Apache configuration
      <Location /grafana/>
        ProxyPass  http://IP:3000/
      </Location>

      <Location /grafana/api/live/ws>
        ProxyPass  ws://IP:3000/api/live/ws
      </Location>
Conclusion
This architecture provides a secure, reliable way to expose home lab services to the internet. By leveraging Cloudflare Tunnel with WebSocket support, you get:
- Enhanced security with no open ports
- Protection from Cloudflare's global network
- Reliable connections for modern web applications
- Simplified management through Kubernetes
The combination of cloudflared, Kubernetes, and Apache HTTPD creates a robust infrastructure that's both secure and flexible, allowing you to safely expose services without compromising on security.
Remember that security is a continuous process - regularly update components, review configurations, and monitor for unusual activity to maintain a strong security posture.