Building a Scalable Image CDN with MinIO, imgproxy, and Cloudflare
Table of Contents
Intro
In today's digital landscape, efficiently serving images is critical for website performance. Users expect fast-loading, responsive websites, and images often account for the majority of a page's weight. In this article, I'll walk you through building a powerful, scalable image CDN using open-source tools that you can deploy in your own infrastructure.
The Architecture
Our image CDN consists of three main components:
- MinIO: An S3-compatible object storage backend that stores our original images
- imgproxy: A fast and secure image processing service that resizes and optimizes images on-the-fly
- Cloudflare: Providing CDN capabilities through Cloudflare Tunnel
This architecture gives us several advantages:
- On-demand image resizing and optimization
- Edge caching for faster global delivery
- Secure, private storage of original assets
- High scalability and cost-effectiveness
How It Works
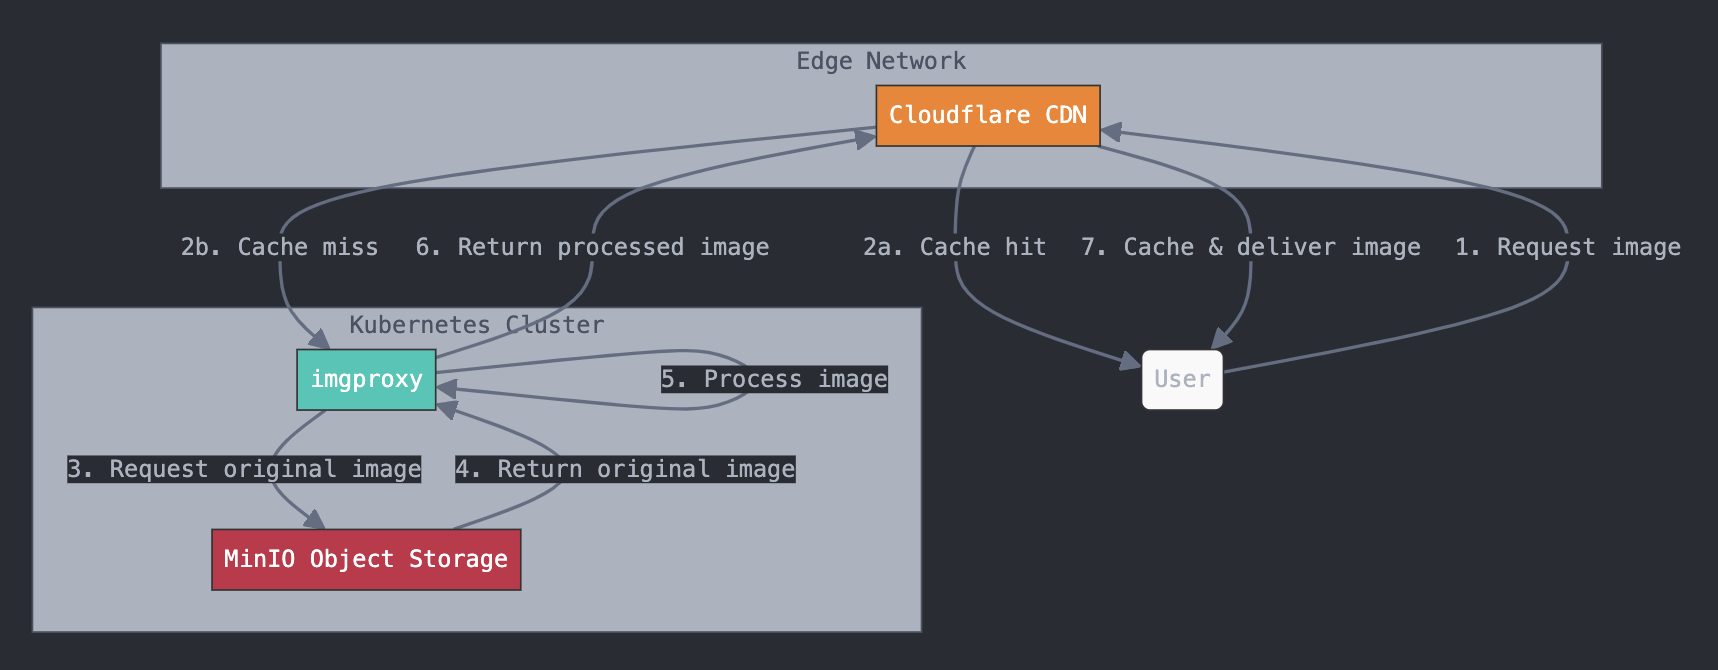
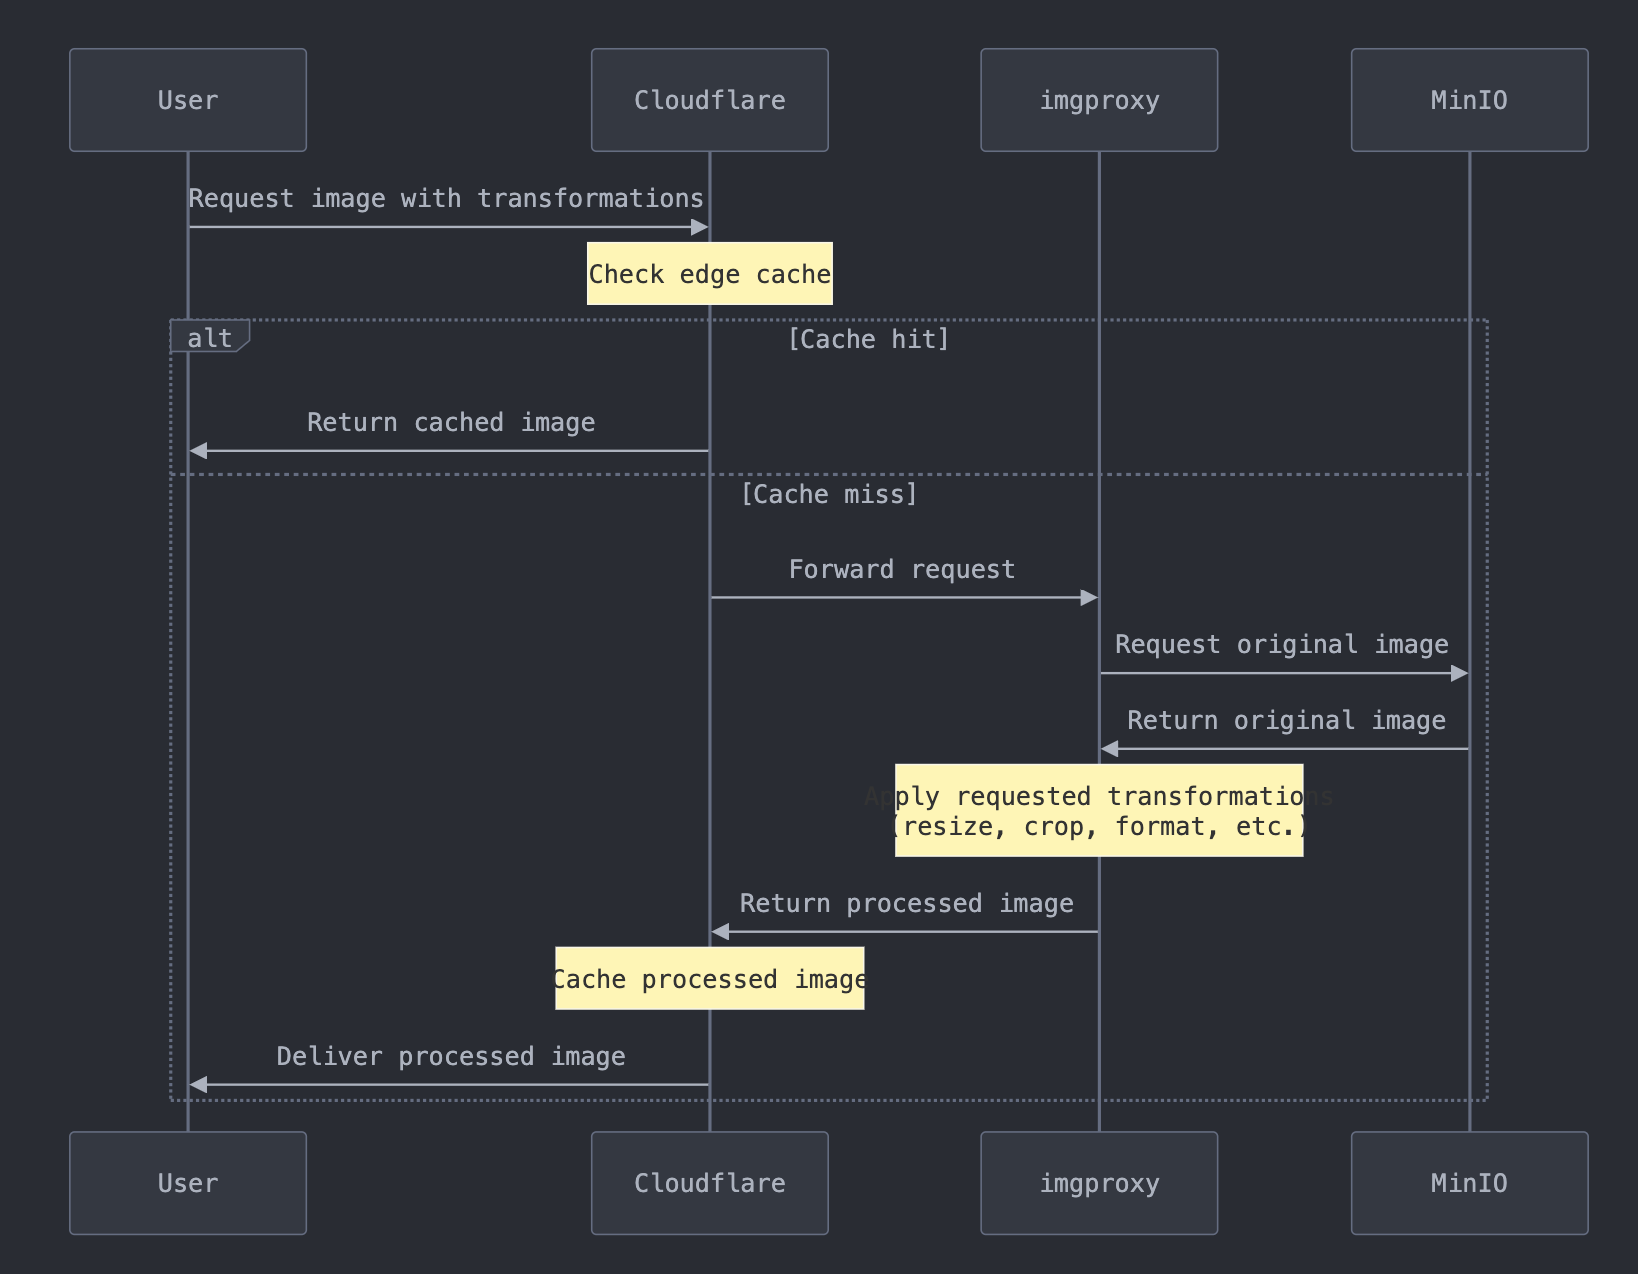
The process flow works like this:
- Users request an image through our CDN URL
- If Cloudflare has the image cached at the edge, it returns it immediately
- If not cached, the request goes to imgproxy
- imgproxy fetches the original image from MinIO
- imgproxy processes the image according to URL parameters (resize, crop, etc.)
- The processed image is returned through Cloudflare and cached at the edge
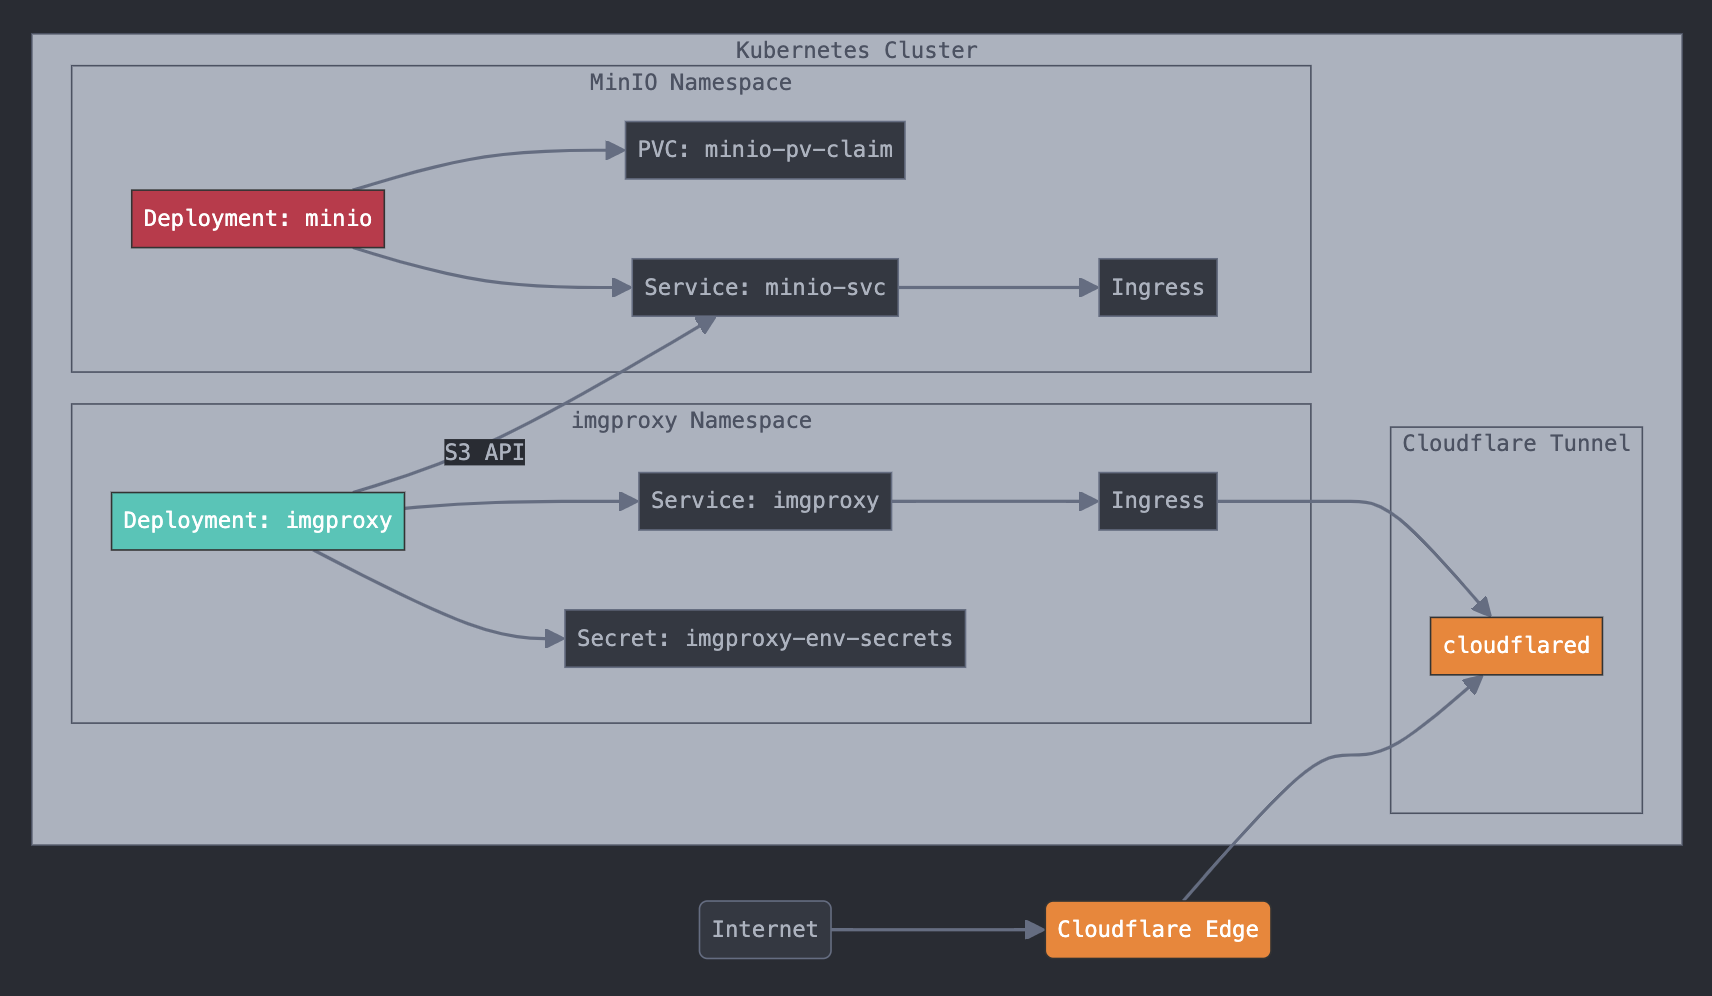
Setting Up MinIO
MinIO is an open-source, S3-compatible object storage server that we'll use to store our original images. Let's deploy it on Kubernetes:
apiVersion: apps/v1
kind: Deployment
metadata:
  name: minio-deployment
  namespace: minio
spec:
  replicas: 1
  selector:
    matchLabels:
      app: minio
  strategy:
    type: Recreate
  template:
    metadata:
      labels:
        app: minio
    spec:
      volumes:
      - name: storage
        persistentVolumeClaim:
          claimName: minio-pv-claim
      containers:
      - name: minio
        image: minio/minio:latest
        args:
        - server
        - /storage
        env:
        - name: MINIO_ACCESS_KEY
          value: "PLACEHOLDER"
        - name: MINIO_SECRET_KEY
          value: "PLACEHOLDER"
        - name: MINIO_DOMAIN
          value: minio-ingress
        ports:
        - containerPort: 9000
          hostPort: 9000
        volumeMounts:
        - name: storage
          mountPath: "/storage"
We also need a persistent volume claim to store our data:
apiVersion: v1
kind: PersistentVolumeClaim
metadata:
  namespace: minio
  name: minio-pv-claim
  labels:
    app: minio-storage-claim
spec:
  storageClassName: microk8s-hostpath
  accessModes:
    - ReadWriteOnce
  resources:
    requests:
      storage: 1Gi
And a service to expose MinIO:
apiVersion: v1
kind: Service
metadata:
  name: minio-svc
  namespace: minio
  labels:
    app: minio
spec:
  ports:
  - name: http
    port: 9000
    targetPort: 9000
  - name: console
    port: 9001
    targetPort: 9001
  selector:
    app: minio
  type: ClusterIP
Setting Up imgproxy
imgproxy is a fast and secure standalone server for resizing and processing images. We'll install it using Helm:
helm repo add imgproxy https://imgproxy.github.io/imgproxy-helm
helm install imgproxy imgproxy/imgproxy -n imgproxy
Then we need to configure it to connect to our MinIO backend through environment variables. These are the critical settings:
IMGPROXY_USE_S3: true
IMGPROXY_S3_ENDPOINT: http://minio-service:9000/
IMGPROXY_S3_BUCKET: images
IMGPROXY_S3_REGION: local
AWS_ACCESS_KEY_ID: PLACEHOLDER
AWS_SECRET_ACCESS_KEY: PLACEHOLDER
IMGPROXY_USE_S3_FORCE_PATH_STYLE: true
IMGPROXY_ALLOW_UNSAFE_URLS: true
Other important imgproxy settings include:
IMGPROXY_QUALITY: 80
IMGPROXY_MAX_SRC_RESOLUTION: 16.8 (controls max source image size in megapixels)
IMGPROXY_STRIP_METADATA: true
IMGPROXY_STRIP_COLOR_PROFILE: true
Setting Up Cloudflare as CDN
To expose our image processing service to the internet securely, we'll use Cloudflare Tunnels, which provides a secure way to connect your resources to Cloudflare without a public IP.
- Install the cloudflared daemon in your cluster
- Configure a Cloudflare Tunnel to point to your imgproxy service
- Create a DNS record in Cloudflare pointing to your tunnel
Usage Examples
Once everything is set up, you can start serving images with transformations. Here are some example URLs:
# Resize to 300x200
https://images.yourdomain.com/unsafe/resize:300:200/plain/s3://bucket/image.jpg

# Resize and crop to 300x300
https://images.yourdomain.com/unsafe/resize:300:300:fill/plain/s3://bucket/image.jpg

# Convert to WebP format
https://images.yourdomain.com/unsafe/format:webp/plain/s3://bucket/image.jpg
Security Considerations
- Always use proper authentication for MinIO
- Consider setting up signing keys for imgproxy to prevent URL tampering
- Use Cloudflare security features like WAF and Rate Limiting
- Implement proper CORS settings if serving images to websites on different domains
Performance Optimization
- Configure appropriate cache TTLs in Cloudflare
- Use Cloudflare's Polish feature in addition to imgproxy's optimizations
- Consider Browser Cache TTL settings
- Enable Brotli compression in Cloudflare
Monitoring and Maintenance
- Set up monitoring for your MinIO and imgproxy services
- Monitor disk usage on your MinIO server
- Track image processing time and resource usage
- Set up alerts for errors or performance degradation
Conclusion
Building your own image CDN provides flexibility, cost efficiency, and control over your image assets. By combining MinIO for storage, imgproxy for processing, and Cloudflare for edge delivery, you get a powerful solution that can handle high traffic loads while optimizing images for different devices and connection speeds.
This setup is particularly useful for sites with user-generated content, e-commerce platforms, or any website with a large number of images that need to be served in various sizes and formats.
The best part is that you maintain complete control over your infrastructure and can scale individual components as needed, while benefiting from the global reach of Cloudflare's CDN network.